
 Tools & Machinery
|
|
|
Jewellery Bezel Block Instructions Last Updated: 08/06/2014 |
||
|
How to Use Bezel Blocks 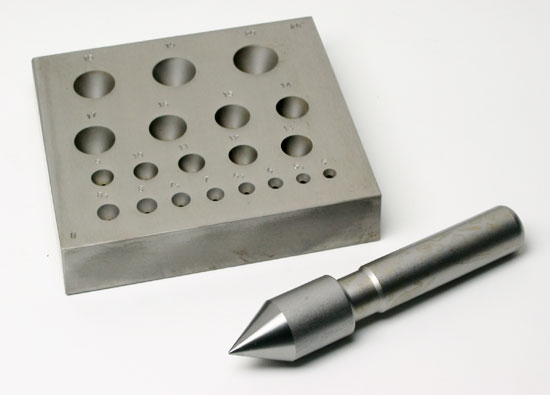 Step 1 & 2 1. Measure the depth of the stone from the table to the cullet and add 1.5 to 2 mm. Estimate the circumference of your stone adding at least 4 mm extra for error. (You can estimate the circumference by wrapping a wire around your stone, marking it then unwrapping and measuring it with a ruler.) (Fig. A) 2. Cut a strip of the sheet metal 22-18 gal. To make your bezel with your measured dimensions. The Next step requires a little imagination. Step 3 & 4 3. Wrap your bezel strip into the basic shape of your stone, use your stone as a guide. The goal is to have the stone sit on the bezels inside edge without any air space. While a perfect fit is great, with the bezel block it doesn't have to be perfect, just close. If you were going to err it would be better to err on the slightly tighter fit than a looser fit. If you are going to make multiple bezels with the same size stone you would be smart to unwrap your bezel material now after getting the right fit and measure it exactly to use it as a length for future bezels. 4. Now it's time to file and connect the bezel butt joint together. The bezel material goes through a fair amount of abuse while it's being formed. This can sometimes crack your solder joints to help eliminate this, there are a couple of tricks you can do. You can weld your joints. Silver and gold weld fairly easily with an oxy/fuel gas torch (not air/acetylene). If you know how to weld non-ferrous metals or you're the adventurous type and want to try it. Step 5 & 6 5. Welding your joint is the way to go. Otherwise use it or hard solder for silver or hard solder for gold. (No matter what you do the joint might crack in the forming process, then you can just resolder or reweld it. it's no big deal.) 6. Put your bezel into the smallest hole on the block where it sticks out of the top about 2mm. With a very slightly rounded face hammer like a planishing hammer pound your bezel down into the block until it is flush with the top. Pull your bezel out and put it into the next smallest hole and pound it into the block until flush again. After a couple of times check the bezel for fit with your stone. The stone should reset just inside the inner wall of the bezel or just slightly smaller than larger. If your stone is the proper fit move on to the next step, if not keep pounding into progressively smaller holes until it is the right fit. Feel free to anneal your bezel in between poundings if you want. Step 7 & 8 7. When the bezel is the right fit put the bezel in the last used hole. Then take the bezel forming punch supplied with the bezel and block and line it as squarely as possible. Pound the punch supplied with the bezel and block firmly with a rawhide mallet. Sometimes you have to hit the punch pretty hard to get it to the form completely. Pull the bezel out of the block and examine it. If all went well it's now the right shape and size. 8. You'll probably have to file the top and bottom some to clean it up and adjust it to the right height, but with very little clean-up work you will have a great bezel to work with. The bezel now needs to be soldered to your jewelry object using traditional fabrication techniques Step 9 9. The stone will need to be set by grinding out a seat for it to sit on and either hammering or pushing the bezel over the stone. The Caveat: These instructions are meant as a simple guideline to give a novice an introduction on how a tapered bezel block works. No responsibility is taken for any outcome following these guidelines. The user is completely responsible for his or her actions.
Tags:
Bezel Block Instructions, how to make bezels, tube bezel instructions, cup bezel instructions, how to do bezel settings, bezel setting instructions, how to make jewellery,
|